| |
Pure Software code |
|
| |
Lebanon  | |
|
|
|
|
Python Pages -
1
2
3
4
5
6 |
|
|
|
| |
| |
|
1- Introduction,
The tkinter
package (“Tk interface”) :
- The Canvas widget
supplies graphics facilities for Tkinter. Among these
graphical objects are lines, circles, images, and even other
widgets. With this widget it's possible to draw graphs and
plots, create graphics editors, and implement various kinds
of custom widgets.
- The tkinter package
(“Tk interface”) is the standard Python interface to the Tk
GUI toolkit. Both Tk and tkinter are available on most Unix
platforms, as well as on Windows systems. (Tk itself is not
part of Python; it is maintained at ActiveState.)
- Running python -m
tkinter from the command line should open a window
demonstrating a simple Tk interface, letting you know that
tkinter is properly installed on your system, and also
showing what version of Tcl/Tk is installed
| |
|
| |
| 2- |
Python Program to display label |
|
|
| |
|
- In this program, of tkinter Module to
display label
Using Visual studio 2019
Compiler - IDE, to compile Python project /
file
- Source Code:
|
Download this
Source Code at python file: PythonAppli2.py - (0.89
KB python file) download |
 |
Continue
|
Python Code,
to display
label | |
|
|
| |
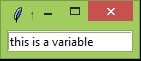
import tkinter as tk
class App(tk.Frame):
def __init__(self, master):
super().__init__(master)
self.pack()
self.entrythingy = tk.Entry()
self.entrythingy.pack()
# Create the application
variable.
self.contents = tk.StringVar()
# Set it to some
value.
self.contents.set("this is a
variable")
# Tell the entry widget to watch
this variable.
self.entrythingy["textvariable"] = self.contents
# Define a callback for when the
user hits return.
# It prints the current value of
the variable.
self.entrythingy.bind('<Key-Return>',
self.print_contents)
def print_contents(self, event):
print( "Hi. The current entry
content is:",
self.contents.get())
root = tk.Tk()
myapp = App(root)
myapp.mainloop() |
|
| | |
- Output:
|
| | |
|
| |
|
| 3- |
Python, Tkinter
Combobox |
|
|
| |
|
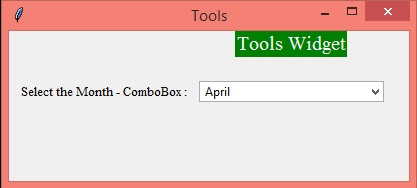
- In this program, of tkinter and random
Module to display Combobox
Using
Visual studio 2019 Compiler - IDE, to compile Python
project / file
- Source Code:
|
Download this Source Code at
python file: Py_Tools1.py - (1.5 KB
Python file)
download
|
|
Continue
|
Python Code,
to display Combobox | |
|
|
| |
|
import
tkinter
as
tk
from
tkinter
import
ttk
# Creating tkinter window
window =
tk.Tk()
window.title( 'Tools')
window.geometry( '400x150')
# label text for title
ttk .Label(window,
text =
"Tools Widget",
background =
'green',
foreground ="white",
font = ( "Times
New Roman",
15)).grid(row = 0, column = 1)
# label
ttk .Label(window,
text =
"Select the Month - ComboBox :",
font = ( "Times
New Roman",
10)).grid(column = 0,
row = 5, padx = 10, pady = 25)
# Combobox creation
n =
tk.StringVar()
monthchoosen =
ttk.Combobox(window,
width = 27, textvariable = n)
# Adding combobox drop down list
monthchoosen[ 'values']
= ('
January',
'
February',
'
March',
'
April',
'
May',
'
June',
'
July',
'
August',
'
September',
'
October',
'
November',
'
December')
monthchoosen. grid(column
= 1, row = 5)
# no data current as a default value -
monthchoosen.current()
# Shows February as a default value -
monthchoosen.current(1)
# Shows April as a default value
monthchoosen.current(3)
# Shows September as a default value -
monthchoosen.current(6)
window.mainloop() |
|
|
| | |
- Output:
 |
 |
|
to display Combobox - ( (monthchoosen.current(3)
= April ) |
to display Combobox, open -
(monthchoosen['values']) | |
| | |
|
| |
|
| 4- |
Python, Tkinter
ListBox |
|
|
| |
|
- In this program, of tkinter and random
Module to display Listbox
Using
Visual studio 2019 Compiler - IDE, to compile Python
project / file
- Source Code:
|
Download this Source Code at
python file: Py_toolsList.py - (1 KB
Python file)
download
|
|
Continue
|
Python Code,
to display ListBox | |
|
|
| |
|
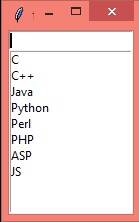
from
tkinter
import *
# Function for checking the
# key pressed and updating
# the listbox
def
checkkey(event):
value =
event.widget.get()
print(value)
#
get data from l
if value
==
'':
data = l
else:
data = []
for item
in l:
if
value.lower()
in
item.lower():
data.append(item)
#
update data in listbox
update(data)
def
update(data):
#
clear previous data
lb.delete(0,
'end')
#
put new data
for item
in
data:
lb.insert( 'end',
item)
# Driver code
l = ( 'C','C++','Java',
'Python','Perl',
'PHP','ASP','JS'
)
root =
Tk()
#creating text box
e =
Entry(root)
e.pack()
e.bind( '<KeyRelease>',
checkkey)
#creating list box
lb =
Listbox(root)
lb.pack()
update(l)
root.mainloop()
|
|
|
| | |
- Output:
 |
 |
 |
|
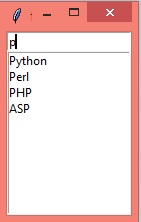
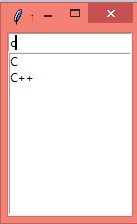
ListBox -
show all items |
ListBox -
show items Store p |
ListBox -
show items store c |
| |
| | |
|
| |
|
| 5- |
Python, Tkinter
CheckButtons |
|
|
| |
|
- In this program, of tkinter and random
Module to display CheckButtons
Using
Visual studio 2019 Compiler - IDE, to compile Python
project / file
- Source Code:
|
Download this Source Code at
python file: Py_chekButtom.py - (1.02 KB
Python file)
download
|
|
Continue
|
Python Code,
to display CheckButtons | |
|
|
| |
|
from
tkinter
import *
root =
Tk()
root.geometry( "300x200")
w =
Label(root,
text ='Checkbuttons',
font =
"50")
w.pack()
Checkbutton1 =
IntVar()
Checkbutton2 =
IntVar()
Checkbutton3 =
IntVar()
Button1 =
Checkbutton(root,
text =
"Tutorial",
variable = Checkbutton1,
onvalue = 1,
offvalue = 0,
height = 2,
width = 10)
Button2 =
Checkbutton(root,
text =
"Student",
variable = Checkbutton2,
onvalue = 1,
offvalue = 0,
height = 2,
width = 10)
Button3 =
Checkbutton(root,
text =
"Courses",
variable = Checkbutton3,
onvalue = 1,
offvalue = 0,
height = 2,
width = 10)
Button1.pack()
Button2.pack()
Button3.pack()
mainloop()
|
|
|
| | |
- Output:
|
| | |
| | |
| |
|
|
6- |
Python, Tkinter
Menu with 3 SubMenus (Columns) |
|
|
| |
|
- In this program, of tkinter and random
Module to display Menu with 3 SubMenus (Columns)
Using
Visual studio 2019 Compiler - IDE, to compile Python
project / file
- Source Code:
|
Download this Source Code at
python file: Py_Menu.py - (2 KB
Python file)
download
|
|
Continue
|
Python Code,
to display Menu with 3 SubMenus (Columns) | |
|
|
| |
|
#
importing only those functions
# which are needed
from
tkinter
import *
from
tkinter.ttk
import *
from
time
import
strftime
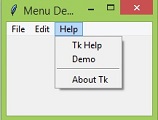
# creating tkinter window
root =
Tk()
root.title( 'Menu
Demonstration')
# Creating Menubar
menubar =
Menu(root)
# Adding File Menu and commands
file =
Menu(menubar,
tearoff = 0)
menubar.add_cascade(label = 'File',
menu = file)
file.add_command(label = 'New
File',
command =
None)
file.add_command(label = 'Open...',
command =
None)
file.add_command(label = 'Save',
command =
None)
file.add_separator()
file.add_command(label = 'Exit',
command = root.destroy)
# Adding Edit Menu and commands
edit =
Menu(menubar,
tearoff = 0)
menubar.add_cascade(label = 'Edit',
menu = edit)
edit.add_command(label = 'Cut',
command =
None)
edit.add_command(label = 'Copy',
command =
None)
edit.add_command(label = 'Paste',
command =
None)
edit.add_command(label = 'Select
All',
command =
None)
edit.add_separator()
edit.add_command(label = 'Find...',
command =
None)
edit.add_command(label = 'Find
again',
command =
None)
# Adding Help Menu
help_ =
Menu(menubar,
tearoff = 0)
menubar.add_cascade(label = 'Help',
menu = help_)
help_.add_command(label = 'Tk
Help',
command =
None)
help_.add_command(label = 'Demo',
command =
None)
help_.add_separator()
help_.add_command(label = 'About
Tk',
command =
None)
# display Menu
root.config(menu = menubar)
mainloop() |
|
|
| | |
- Output:
 |
 |
 |
 |
|
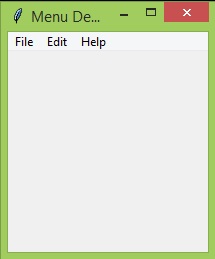
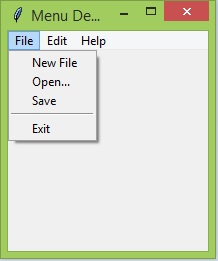
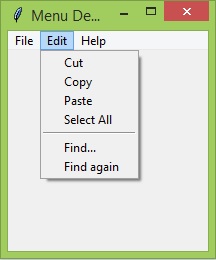
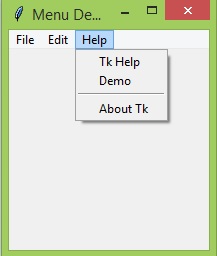
Menu width 3 subMenu closed |
subMenu "File" of Menu opened |
subMenu "Edit" of Menu opened |
subMenu "Help" of Menu opened |
| |
| | |
|
| |
|
| 7a- |
Python, Tkinter
Buttons - 1 |
| |
|
| 7a.1- Python Program to
display Buttons |
|
- In this program, of tkinter Module to
display Buttons
Using Visual studio 2019
Compiler - IDE, to compile Python project /
file
| |
|
Continue
|
Tkinter
Button, Syntax and Parameters | |
|
|
| |
1- Syntax
the simple
syntax to create this widget
w = Button ( master, option = value, ... )
|
2-
Parameters
- master − This represents the parent
window.
- options − Here is the list of most
commonly used options for this widget. These
options can be used as key-value pairs
separated by commas.
| Sr.No. |
Option &
Description |
|
1 |
activebackground Background
color when the button is under the cursor. |
|
2 |
activeforeground Foreground
color when the button is under the cursor. |
|
3 |
bd Border width in pixels.
Default is 2. |
|
4 |
bg Normal background color. |
|
5 |
command Function or method to
be called when the button is clicked. |
|
6 |
fg Normal foreground (text)
color. |
|
7 |
font Text font to be used for
the button's label. |
|
8 |
height Height of the button in
text lines (for textual buttons) or pixels
(for images). |
|
9 |
highlightcolor
The color of the focus highlight when the
widget has focus. |
|
10 |
image Image to be displayed on
the button (instead of text). |
|
11 |
justify How to show multiple
text lines: LEFT to left-justify each line;
CENTER to center them; or RIGHT to
right-justify. |
|
12 |
padx Additional padding left
and right of the text. |
|
13 |
pady Additional padding above
and below the text. |
|
14 |
relief Relief specifies the
type of the border. Some of the values are
SUNKEN, RAISED, GROOVE, and RIDGE. |
|
15 |
state Set this option to
DISABLED to gray out the button and make it
unresponsive. Has the value ACTIVE when the
mouse is over it. Default is NORMAL. |
|
16 |
underline Default is -1,
meaning that no character of the text on the
button will be underlined. If nonnegative,
the corresponding text character will be
underlined. |
|
17 |
width Width of the button in
letters (if displaying text) or pixels (if
displaying an image). |
|
18 |
wraplength If this value is set
to a positive number, the text lines will be
wrapped to fit within this length. |
|
| | |
|
| | |
| |
- Source Code:
|
Download this
Source Code at python file: pytkinter11.py -
(0.3 KB python file)
download |
|
Continue
|
Python Code,
to display
Buttons | |
|
|
| |
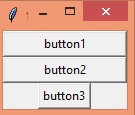
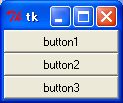
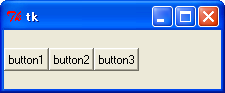
#11-Buttons
import
tkinter as Tkinter
root = Tkinter.Tk()
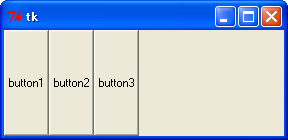
b1 = Tkinter.Button(root, text='button1')
b1.pack(fill= 'both')
b2 = Tkinter.Button(root, text='button2')
b2.pack(fill= 'x')
b3 = Tkinter.Button(root, text='button3')
b3.pack(fill= 'y')
root.mainloop() |
|
| | |
- Output:
|
| | |
| |
| 7a.2- Python Program to display 2 Buttons
with 2 functions |
|
- In this program, of tkinter Module to
display 2 Buttons with 2 functions
Using
Visual studio 2019 Compiler - IDE, to compile Python
project / file
- Source Code:
|
Download this
Source Code at python file: PythonAppli.py - (0.72
KB python file) download |
|
Continue
|
Python Code,
to display 2 Buttons with 2
functions | |
|
|
| |
import tkinter as
tk
class Application(tk.Frame):
def
__init__(self, master=None):
super().__init__(master)
self.master =
master
self.pack()
self.create_widgets()
def
create_widgets(self):
self.hi_there =
tk.Button(self)
self.hi_there["text"] =
"Hello World\n(click me)"
self.hi_there["command"]
= self.say_hi
self.hi_there.pack(side="top")
self.quit
= tk.Button(self, text="QUIT", fg="red",
command=self.master.destroy)
self.quit.pack(side="bottom")
def
say_hi(self):
print("hi there, everyone!")
root = tk.Tk()
app = Application(master=root)
app.mainloop() |
|
| | |
- Output:
Pic1  after to click
button Hello Word (click me) of Pic1, to display
text at command prompt in pic2 after to click
button Hello Word (click me) of Pic1, to display
text at command prompt in pic2
|
| |
Pic2 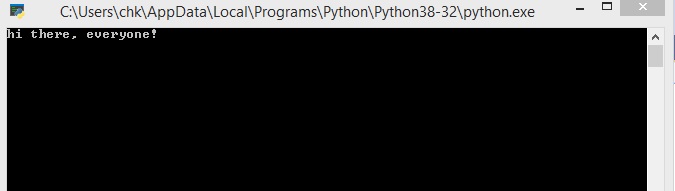 | | |
| | |
|
| |
|
| 7b- |
Python, Tkinter
Buttons - 2 |
|
|
| |
|
|
| |
| 7b.1-
(Buttons) |
|
7b.2-
(Buttons) |
| Python Code: |
|
Python Code: |
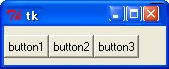
import
                              Tkinter

root = Tkinter.Tk()
b1 =
                              Tkinter.Button(root,
                              text='button1')
b1.pack(side='left')
b2 =
                              Tkinter.Button(root,
                              text='button2')
b2.pack(side='left')
b3 =
                              Tkinter.Button(root,
                              text='button3')
b3.pack(side='left')
root.mainloop() |
|
import
                              Tkinter

root = Tkinter.Tk()
b1 =
                              Tkinter.Button(root,
                              text='button1')
b1.pack(fill='both')
b2 =
                              Tkinter.Button(root,
                              text='button2')
b2.pack(fill='both')
b3 =
                              Tkinter.Button(root,
                              text='button3')
b3.pack(fill='both')
root.mainloop() |
| Output : |
|
Output : |
|
|
|
|
| |
|
|
  |
|
|
|
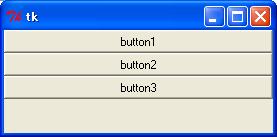
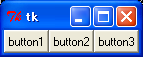
7b.3-
(Buttons) |
|
7b.4-
(Buttons) |
| Python Code: |
|
Python Code: |
import
                              Tkinter

root = Tkinter.Tk()
b1 =
                              Tkinter.Button(root,
                              text='button1')
b1.pack(fill='both',
                              side='left')
b2 = Tkinter.Button(root,
                              text='button2')
b2.pack(fill='both',
                              side='left')
b3 = Tkinter.Button(root,
                              text='button3')
b3.pack(fill='both',
                              side='left')
root.mainloop() |
|
import
                              Tkinter

root = Tkinter.Tk()
b1 =
                              Tkinter.Button(root,
                              text='button1')
b1.pack(fill='both',
                              side='left')
b2 = Tkinter.Button(root,
                              text='button2')
b2.pack(fill='both',
                              side='left')
b3 = Tkinter.Button(root,
                              text='button3')
b3.pack(fill='both',
                              side='left', expand =
                              True)
root.mainloop() |
| Output : |
|
Output : |
|
|
|
|
| |
|
|
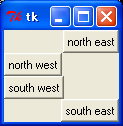
| 7b.5-
(Buttons) |
|
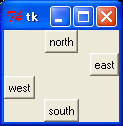
7b.6-
(Buttons) |
| Python Code: |
|
Python Code: |
import
                              Tkinter

root = Tkinter.Tk()
b2 =
                              Tkinter.Button(root, text='north
                              east')
b2.pack(anchor = 'ne')
b8 =
                              Tkinter.Button(root, text='north
                              west')
b8.pack(anchor = 'nw')
b6 =
                              Tkinter.Button(root, text='south
                              west')
b6.pack(anchor = 'sw')
b4 =
                              Tkinter.Button(root, text='south
                              east')
b4.pack(anchor =
                              'se')
root.mainloop() |
|
import
                              Tkinter

root = Tkinter.Tk()
b1 =
                              Tkinter.Button(root,
                              text='north')
b1.pack(anchor = 'n')
b2 =
                              Tkinter.Button(root,
                              text='east')
b2.pack(anchor = 'e')
b3 =
                              Tkinter.Button(root,
                              text='west')
b3.pack(anchor = 'w')
b4 =
                              Tkinter.Button(root,
                              text='south')
b4.pack(anchor =
                              's')
root.mainloop() |
| Output : |
|
Output : |
 |
|
 | |
| |
|
| |
| 7b.7- (Frames) |
| Python
Code: |
import Tkinter

root
                              = Tkinter.Tk()

f0 =
                              Tkinter.Frame(root)
f1 =
                              Tkinter.Frame(root)

b1 = Tkinter.Button(f0,
                              text = 'button1')
b1.pack(side = 'left')
b2
                              = Tkinter.Button(f0, text =
                              'button2')
b2.pack(side = 'left')
b3 =
                              Tkinter.Button(f0, text =
                              'button3')
b3.pack(side = 'left')

b4 =
                              Tkinter.Button(f1, text = 'button4')
b4.pack(
                              fill = 'both')
b5 = Tkinter.Button(f1, text =
                              'button5')
b5.pack( fill = 'both')
b6 =
                              Tkinter.Button(f1, text = 'button6')
b6.pack(
                              fill = 'both')

f0.pack()
f1.pack(fill =
                              'both')

root.mainloop() |
| Output
: |
 | |
| |
|
| |
| 7b.8- (Frames) |
| Python
Code: |
import Tkinter

root
                              = Tkinter.Tk()

f0 = Tkinter.Frame(root,
                              width = 50, height = 50, relief = 'flat',
                              borderwidth = 4, bg = 'gray')
f0.pack(padx = 5,
                              pady = 5, side = 'left')
f1 =
                              Tkinter.Frame(root, width = 50, height = 50,
                              relief = 'raised', borderwidth = 4, bg =
                              'gray')
f1.pack(padx = 5, pady = 5, side =
                              'left')
f2 = Tkinter.Frame(root, width = 50,
                              height = 50, relief = 'sunken', borderwidth = 4,
                              bg = 'gray')
f2.pack(padx = 5, pady = 5, side =
                              'left')
f3 = Tkinter.Frame(root, width = 50,
                              height = 50, relief = 'groove', borderwidth = 4,
                              bg = 'gray')
f3.pack(padx = 5, pady = 5, side =
                              'left')
f4 = Tkinter.Frame(root, width = 50,
                              height = 50, relief = 'ridge', borderwidth = 4, bg
                              = 'gray')
f4.pack(padx = 5, pady = 5, side =
                              'left')

root.mainloop() |
| Output
: |
| |
| |
|
| |
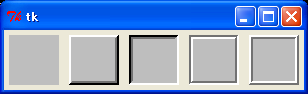
| 7b.9-
(LabelFrame) |
| Python
Code: |
import Tkinter

root
                              = Tkinter.Tk()

f0 =
                              Tkinter.LabelFrame(root, text = 'flat', width =
                              100, height = 100, relief = 'flat', borderwidth =
                              4)
f0.pack(padx = 5, pady = 5, side =
                              'left')
f1 = Tkinter.LabelFrame(root, text =
                              'raised', width = 100, height = 100, relief =
                              'raised', borderwidth = 4)
f1.pack(padx = 5,
                              pady = 5, side = 'left')
f2 =
                              Tkinter.LabelFrame(root, text = 'sunken', width =
                              100, height = 100, relief = 'sunken', borderwidth
                              = 4)
f2.pack(padx = 5, pady = 5, side =
                              'left')
f3 = Tkinter.LabelFrame(root, text =
                              'groove', width = 100, height = 100, relief =
                              'groove', borderwidth = 4)
f3.pack(padx = 5,
                              pady = 5, side = 'left')
f4 =
                              Tkinter.LabelFrame(root, text = 'ridge', width =
                              100, height = 100, relief = 'ridge', borderwidth =
                              4)
f4.pack(padx = 5, pady = 5, side =
                              'left')

root.mainloop() |
| Output
: |
 | |
| |
|
| |
|
| |
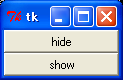
| 7b..10-
(lower) |
| Python
Code: |
import Tkinter

root
                              = Tkinter.Tk()

def
                              hide():
b1.lower()

def
                              show():
f.lower()

f =
                              Tkinter.Frame(root)
f.pack(fill = 'x')
b1 =
                              Tkinter.Button(text = 'hide', command =
                              hide)
b1.pack(in_ = f, fill = 'x')
b2 =
                              Tkinter.Button(root, text = 'show', command =
                              show)
b2.pack(fill =
                              'x')

root.mainloop() |
| Output
: |
| |
| |
|
| |
|
| |
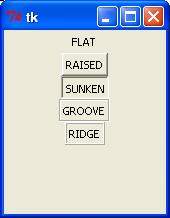
| 7b..11-
(lower) |
| the list of possible
relief styles − Here ispossible constants which
can be used for relief attribute.
- FLAT
- RAISED
- SUNKEN
- GROOVE
- RIDGE
|
| |
| Python
Code: |
from
Tkinter
import
*
import
Tkinter
top =
Tkinter.Tk()
B1 =
Tkinter.Button(top,
text ="FLAT",
relief=FLAT
)
B2 =
Tkinter.Button(top,
text ="RAISED",
relief=RAISED
)
B3 =
Tkinter.Button(top,
text ="SUNKEN",
relief=SUNKEN
)
B4 =
Tkinter.Button(top,
text ="GROOVE",
relief=GROOVE
)
B5 =
Tkinter.Button(top,
text ="RIDGE",
relief=RIDGE
)
B1.pack()
B2.pack()
B3.pack()
B4.pack()
B5.pack()
top.mainloop() |
| Output
: |
 | |
|
|
| |
|
| 7c- |
Python, Tkinter
Buttons - 3 |
| |
|
| |
| |
| 7c.1- (Pack) |
|
|
The Pack geometry manager packs widgets in rows or columns. We can use options like fill, expand, and side to control this geometry manager.
Compared to the grid manager, the pack manager is somewhat limited, but it’s much easier to use in a few, but quite common situations:
- Put a widget inside a frame (or any other container widget), and have it fill the entire frame
- Place a number of widgets on top of each other
- Place a number of widgets side by side
|
|
|
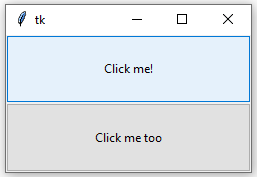
7c.1.1 |
Putting
a widget inside frame and filling entire frame |
|
|
| |
| 1- Python
Code: |
2- Output
: |
|
# Importing
tkinter module
from tkinter import * from tkinter.ttk import *
# creating Tk window
master = Tk()
# cretaing a Fra, e which can expand according
# to the size of the window
pane = Frame(master)
pane.pack(fill = BOTH, expand = True)
# button widgets which can also expand and fill
# in the parent widget entirely
b1 = Button(pane, text = "Click me!")
b1.pack(fill = BOTH, expand = True)
b2 = Button(pane, text = "Click me too")
b2.pack(fill = BOTH, expand = True)
mainloop() |
 |
|
| |
|
|
7c.1.2 |
Placing
widgets side by side - Vertical Alignment |
|
|
| |
| 1- Python
Code: |
2- Output
: |
# Importing
tkinter module
from tkinter import *
# from tkinter.ttk import *
# creating Tk window
master = Tk()
# cretaing a Fra, e which can expand according
# to the size of the window
pane = Frame(master)
pane.pack(fill = BOTH, expand = True)
# button widgets which can also expand and fill
# in the parent widget entirely
b1 = Button(pane, text = "Click me 1!", background
= "red", fg = "white")
b1.pack(side = TOP, expand = True, fill = BOTH)
b2 = Button(pane, text = "Click me too", background
= "blue", fg = "white")
b2.pack(side = TOP, expand = True, fill = BOTH)
b3 = Button(pane, text = "I'm also button",
background = "green", fg = "white")
b3.pack(side = TOP, expand = True, fill = BOTH)
mainloop() |
.png) |
|
| |
|
|
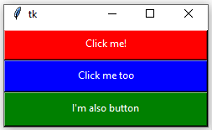
7c.1.3 |
Placing
widgets side by side - Horizontal Alignment |
|
|
| |
| 1- Python
Code: |
2- Output
: |
# Importing
tkinter module
from tkinter import *
# from tkinter.ttk import *
# creating Tk window
master = Tk()
# cretaing a Fra, e which can expand according
# to the size of the window
pane = Frame(master)
pane.pack(fill = BOTH, expand = True)
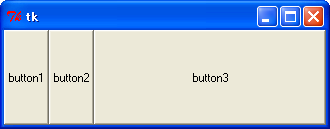
# button widgets which can also expand and fill
# in the parent widget entirely
b1 = Button(pane, text = "Click me!", background
= "red", fg = "white")
b1.pack(side = LEFT, expand = True, fill = BOTH)
b2 = Button(pane, text = "Click me too", background
= "blue", fg = "white")
b2.pack(side = LEFT, expand = True, fill = BOTH)
b3 = Button(pane, text = "I'm also button",
background = "green", fg = "white")
b3.pack(side = LEFT, expand = True, fill = BOTH)
mainloop() |
 |
|
|
|
|
|
|
|
|
|
| |
|
Python Pages -
1
2
3
4
5
6 |
| |
| www.puresoftwarecode.com
: |
|
HUMANITIES
Institute |
ART Institute &
Others |
| SOFTWARE
Institute - "Free, 120 Training Courses" |
CHRISTIANITY
Institute |
|
|
| Python, Teach yourSelf Programs in
6 pages, in English |
|
Le HANDICAP c'est quoi ? (in
French) |
Basilica Architecture, in the Shape
of a Cross |
| VISUAL STUDIO 2019, C# Programs, in English |
Holy BIBLE in 22 Languages and Studies
... |
Drugs and Treatment in English, french,
Arabic |
Old Traditional Lebanese
houses |
| VISUAL STUDIO 2010 in
English |
220 Holy Christian
ICONS |
Classification of Wastes from the Source
in Arabic |
5 DRAWING Courses & 3
Galleries |
| VISUAL STUDIO .NET, Windows & ASP in
English |
Catholic Syrian MARONITE Church
|
|
Meteora,
Christianity Monasteries - En, Ar,
Fr |
| VISUAL STUDIO 6.0 in
English |
HOLY MASS of Maronite Church - Audio
in Arabic |
Christianity in the Arabian Peninsula in
Arabic |
Monasteries of Mount Athos &
Pilgrimage |
| Microsoft ACCESS in
English |
VIRGIN MARY, Mother of JESUS CHRIST
GOD |
Summary of the Lebanese history in
Arabic |
Carved Rock Churches, in Lalibela,
Ethiopia |
| PHP & MySQL in
English |
SAINTS of the Church |
LEBANON EVENTS 1840 & 1860, in
Arabic |
|
| SOFTWARE GAMES in
English |
Saint SHARBEL - Sharbelogy in 10
languages, Books |
Great FAMINE in LEBANON 1916, in
Arabic |
my PRODUCTS, and Statistiques
... |
| WEB DESIGN in English |
Catholic RADIO in Arabic, Sawt el
Rab |
Great FAMINE and Germny Role 1916,
in Arabic |
|
| JAVA SCRIPT in
English |
Читать -
БИБЛИЯ и Шарбэль cвятой, in Russe |
Armenian Genocide 1915 in
Arabic |
4 Different
STUDIES |
| FLASH - ANIMATION in
English |
|
Sayfo or Assyrian Genocide 1915 in
Arabic |
SOLAR Energy & Gas
Studies |
| PLAY, 5 GAMES |
|
|
|
| |
|
Christianity in Turkey in
Arabic |
WELCOME to LEBANON |
| SAADEH BEJJANE
Architecture |
Andree Zouein
Foundation |
|
YAHCHOUCH, my Lebanese
Village |
| CARLOS SLIM HELU Site. new
design |
REPORT, Cyber Attack Attacks the Current
Site |
Prononce English and French and Arabic
Letters |
ZOUEIN, my Family - History &
Trees | |
|
|
| | |